
A Simple Pinterest Traffic Workflow for New Affiliate Blogs

Five articles. Three weeks of research and writing. And an analytics graph that has been a flat line along the bottom since the day you hit publish. Nothing is broken. Google just takes months to decide whether a new domain is worth ranking, and there is no arguing with it.
So you go looking for Pinterest traffic for affiliate marketing, because everyone says it works faster. What you find is advice telling you to publish thirty pins a day, or to paste your affiliate link straight onto the graphic and let Pinterest handle the selling. Both feel like trading one impossible job for another.
Waiting out that first stretch of search silence is one of the hardest parts of building an online business. Burning yourself out on a daily posting quota is not the fix, though, and it is not what the platform actually rewards.
Pinterest is a search engine that happens to be visual. People type queries into it the way they type them into Google, and a pin that answers one keeps working for months.
Here is the routine worth building instead: 45 minutes once a week, 3 pin angles pulled from every post you publish, and 1 routing rule that protects your account while it builds authority for your site.
TL;DR: Pinterest Traffic for Affiliate Marketing
Why Pinterest Is a Search Engine, Not a Social Feed
The reason Pinterest can send readers to a site Google has not warmed up to yet has nothing to do with social reach. It has to do with how Pinterest decides what to show people in the first place.
Pinterest reads text. It reads the words on your pin graphic, the title and description you write underneath it, and the name of the board you save it to. Then it matches all of that against what people type into its search bar.
A pin comparing two email tools does not surface because you have followers. It surfaces because someone searched for a comparison of two email tools and your pin was the closest text match Pinterest could find.
That one mechanical difference changes the math on everything else. A post on a chronological feed is competing for attention in a window measured in a day or two, because the feed keeps moving and yesterday’s post is gone.
A pin sits in an index. It gets pulled up whenever someone searches the words attached to it, which is why pins routinely send clicks months after they were published, long after you have forgotten writing them.
Which is exactly the gap you are trying to cover right now. A new domain spends its first months being evaluated rather than ranked, and there is no lever you can pull to shorten that.
Google Search Console will usually show impressions climbing before any clicks arrive, and reading early Search Console impressions correctly is how you tell the difference between a normal wait and something genuinely broken. Pinterest gives you a second front door while that evaluation runs.
One warning before you open the dashboard. Pinterest shows you a “monthly viewers” number on your profile, and it is close to meaningless. It counts everyone whose screen your pin passed across, including people who scrolled straight by. Followers are not much better for a site like yours, because search-driven distribution does not need them.
Once you accept that a pin is a search result pointing at something, the next question is what it should point at. Most beginners answer that one wrong, and it is the mistake that costs people their accounts.
The Direct-Linking Trap: Why You Must Route Pins to Owned Reviews
The shortcut is obvious and it is why so many people take it. Make a graphic, drop the affiliate link in the destination field, skip the writing entirely. No article needed, no site needed, straight from pin to product page.
You will hear the objection immediately, and it is a fair one: Pinterest does permit affiliate links, as long as you disclose them. True. Permitted and advisable are not the same thing, though, and there are two separate reasons to route your pins somewhere else.
The first is account risk. A brand new account posting graphics that all point outward through the same redirect string looks, to an automated system, exactly like the pattern spam behaves in.
You may be fine. You may also find your pins quietly stop being distributed, with no notification explaining why, and no obvious way to appeal it. Pinning to a domain you have claimed and control removes that whole category of problem.
The second reason is the one that actually matters for your business. A direct affiliate link gives you a single, cold attempt at a sale, from someone who arrived expecting information and got a checkout page instead.
A pin that lands on your own review gives you a reader who is already reading, an email signup you can offer, an internal path to three other relevant posts, and a cookie you set on your own terms.
It also gives that post a traffic signal it can use, which is why setting up internal links across your cluster, meaning the group of related posts you have written on one topic, starts paying off the moment Pinterest begins feeding one of them.
Here is the same decision laid out side by side, so you can see what each approach is actually buying you.
Strategy Factor
Direct Affiliate Pinning
Owned Blog Post Routing
Account safety and spam risk
Repeated outbound redirect strings from a new account resemble spam patterns and risk throttling
Traffic goes to a domain you have claimed and control, which is the pattern the platform is built around
Tracking and cookie control
Vulnerable to link stripping and redirect handling you do not control
You own the analytics, the tags, and the cookie the reader receives
Reader trust and context
Zero pre-framing. The reader clicked for information and landed on an ad
An honest review with pros, cons, and a clear verdict before any recommendation
Long-term asset building
The link works once, then leaves nothing behind
Every click strengthens a page you own and can grow an email list from
Monetization breadth
One product, one chance
Several relevant recommendations plus internal links to the rest of your cluster
Account safety and spam risk
Direct Affiliate Pinning: Repeated outbound redirect strings from a new account resemble spam patterns and risk throttling
Owned Blog Post Routing: Traffic goes to a domain you have claimed and control, which is the pattern the platform is built around
Tracking and cookie control
Direct Affiliate Pinning: Vulnerable to link stripping and redirect handling you do not control
Owned Blog Post Routing: You own the analytics, the tags, and the cookie the reader receives
Reader trust and context
Direct Affiliate Pinning: Zero pre-framing. The reader clicked for information and landed on an ad
Owned Blog Post Routing: An honest review with pros, cons, and a clear verdict before any recommendation
Long-term asset building
Direct Affiliate Pinning: The link works once, then leaves nothing behind
Owned Blog Post Routing: Every click strengthens a page you own and can grow an email list from
Monetization breadth
Direct Affiliate Pinning: One product, one chance
Owned Blog Post Routing: Several relevant recommendations plus internal links to the rest of your cluster
The tradeoff is real and worth naming: routing to your own content is slower. You need the article written before the pin can exist, and that is more work than making a graphic on a Saturday morning. What you get for it is an asset that keeps earning after the pin stops being distributed, which the direct link never does.
Current Pin Formats and Specs That Actually Get Clicked
Pin sizing is one of the few genuinely fixed rules on the platform, so it is worth getting right once and never thinking about again.
The standard is a 2:3 vertical ratio, which means 1000 x 1500 pixels. That shape exists because Pinterest’s feed is a phone-first column of vertical tiles, and 2:3 is the tallest shape the feed displays in full.
Go taller, and your pin gets cropped in the feed, which usually means your text overlay loses its bottom line. Go square, and you occupy noticeably less vertical space than every pin around you, so you are simply less visible.
Pinterest publishes its current dimensions in the Pinterest help documentation on Pin specs, and it is worth a look before you build a template.
Format-wise, the picture is simpler than it used to be. Idea Pins, the multi-page format Pinterest pushed for a while, have been folded back into the standard creation flow, so you are no longer choosing between a format that gets reach and a format that can send people to your website.
Every pin you make can carry a destination link. If a tutorial tells you otherwise, it was written before the change.
A pin that gets clicked does three things in about two seconds. It shows a clean visual with enough context that the topic is obvious, it carries a bold text overlay you can read at thumbnail size on a phone, and that overlay names a specific problem or outcome rather than a topic. “Email Marketing Tips” is a topic. “Nobody Opens Your Emails? Start Here” is a problem, and the difference in click rate between those two is not subtle.
None of that requires design skill you do not have. If you are already generating blog post images with AI, the same workflow makes pin graphics. You change the canvas to 1000 x 1500 and add the text layer on top.
One compliance item, and it is not optional. If the post your pin points to contains affiliate links, or if the pin itself is promoting something you earn on, the relationship has to be disclosed clearly, and a hashtag buried at the end of a long description does not clear that bar.
Put “#affiliate” or “#ad” early in the pin description where a scrolling reader will actually see it, and keep the full disclosure on the destination page. The FTC’s endorsement guides spell out the standard, which is that a disclosure has to be hard to miss rather than technically present.
The 3-Pin Angle Framework for Every Blog Post
You will read advice telling you to make ten pins per post and spread them across every board you own. Do not. Ten near-identical graphics for one URL is duplication, and Pinterest is reasonably good at recognizing when it is being shown the same thing repeatedly.
Three genuinely different pins outperform ten variations of the same one, because each one is fishing in a different pool of search terms.
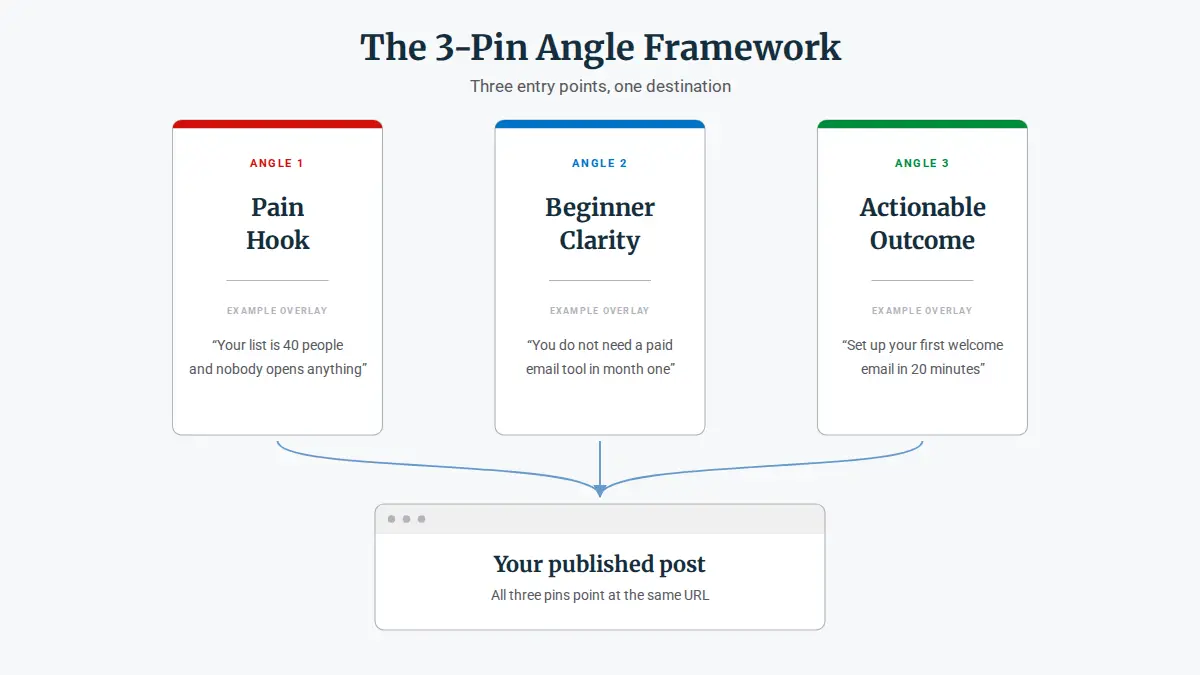
The framework below pulls three separate entry points out of any post you have already written. The graphics differ, the text overlays differ, and the descriptions target different phrasing, but all three point at the same URL. Take a beginner’s guide to email marketing tools as the running example.
Angle 1: The Pain Hook (Naming the Reader’s Friction)
This pin names the frustration the reader is sitting in right now, in the words they would use themselves. It is not selling the solution yet. It is signalling recognition, which is what makes someone stop scrolling.
For the email tools post, the overlay reads something like “Your list is 40 people, and nobody opens anything.” That pin catches searches built around the problem rather than the product, which is where most beginners actually start searching.
Angle 2: Beginner Clarity (Dismantling a Common Myth)
This one takes a belief the reader almost certainly holds and corrects it. Myth-correcting pins work because they create a small gap the reader wants closed, and closing it requires the click.
The overlay might read “You do not need a paid email tool in month one.” It targets a completely different search intent from the first pin, closer to “do I need this yet,” and it tends to pull a different, earlier-stage reader.
Angle 3: Actionable Outcome (Highlighting the Practical Fix)
The third pin promises a concrete result and a small scope. Specificity is the whole job here, and a number usually helps, as long as it is one your post genuinely delivers.
“Set up your first welcome email in 20 minutes” works. “Grow your list fast” does not, because it names no outcome the reader can picture and no effort they can commit to.
A note on pacing, because this matters more when your catalogue is small. If you have five published posts, do not fire all fifteen pins into the platform in one week. Spread them out, one post’s worth of angles per week, and you have five solid weeks of scheduled pinning from articles you have already written.
A steady trickle from a young account also reads as more normal than a sudden burst, and it means you are never staring at an empty queue on a week when the writing did not happen.
The 45-Minute Weekly Batching Routine
Everything above is theory until it has a slot in your week. This is the version that survives contact with a real schedule: one sitting, once a week, three to five pins produced, dashboard closed at the end.
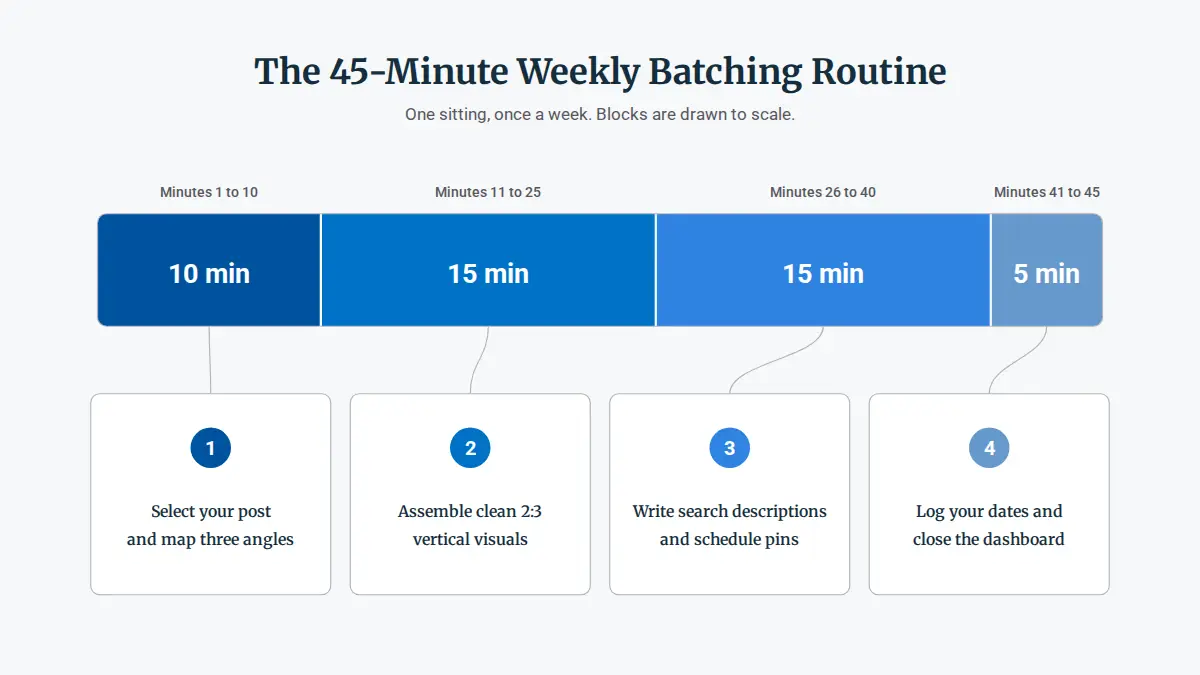
Minutes 1 to 10: Select Your Post and Map Three Angles
Pick one published article. Not the newest one automatically, just one that has not been pinned yet or has not been pinned in a while. Write your three overlay lines on paper before you open any design tool.
Doing the thinking first is the entire reason this stays at forty-five minutes. If you open a design tool with no angles decided, you will spend thirty minutes choosing fonts and finish with one pin.
Minutes 11 to 25: Assemble Clean 2:3 Vertical Visuals
Build a 1000 x 1500 template once, then reuse it forever. Your own fonts, your own two or three colors, a consistent layout with space reserved for the text overlay. The fonts and colors you lock in here are the same ones your blog header and Facebook graphic need, so it is worth building your blog and Facebook frames at the same time.
After the template exists, this block is genuinely mechanical: swap the background image, paste in the overlay line, export. Fifteen minutes covers three pins comfortably once you stop redesigning the template every week.
Minutes 26 to 40: Write Search Descriptions and Schedule Pins
Each pin needs a title and a description written for the search bar, not for a caption. Say plainly what the reader will get and use the phrasing someone would actually type, then add your disclosure hashtag if the destination post carries affiliate links.
Schedule all three rather than publishing them together. Spacing them across the coming days gives each pin its own window to be tested by the algorithm, instead of forcing three of your own pins to compete with each other on the same afternoon.
Minutes 41 to 45: Log Your Dates and Close the Dashboard
Write down which post you pinned, which three angles you used, and the dates they publish. A single spreadsheet row is enough, and in two months that log is the only thing that will tell you which angle type earns clicks for you.
Then close the tab. This is the part people skip, and it is the part that protects the routine.
Nobody quits Pinterest because forty-five minutes a week was too much. They quit because forty-five minutes turned into ninety when the feed pulled them sideways, or because they went back to check the numbers three times a day and watched a graph that had not moved yet. The boundary is what makes this sustainable, not the pinning.
Worth being honest about the stack this assumes: a design tool, your WordPress dashboard, a scheduler, and analytics in two places. That is four logins to keep straight, and tool sprawl is a real reason beginners stall out before month three.
If you would rather have hosting, training, and keyword research sitting in one place, that is what an all-in-one platform workspace is built to solve. It will not do your pinning for you, and it is not a substitute for having something worth pinning, but it does cut down the number of tabs the routine has to survive.
How to Measure Real Progress Without Daily Dashboard Anxiety
The measurement problem in the first few months is not that the numbers are bad. It is that the loud numbers are the useless ones, and staring at them will talk you out of a routine that is working.
Ignore monthly viewers. Ignore impressions. Ignore follower count. All three move for reasons that have nothing to do with whether anyone came to your site, and a spike in any of them can happen on a day you got zero clicks.
Two numbers tell you the truth. In Pinterest Analytics, look at outbound clicks, which counts the people who actually left the platform for your article. In your own site analytics, look at referral sessions from Pinterest, and check whether those people stayed to read or bounced in four seconds.
Those two counts will never line up exactly, and the size of the gap tells you different things. If outbound clicks climb while referral sessions barely move, the cause is usually mechanical rather than editorial, because readers on slow phone connections often leave before your analytics script finishes loading.
Over-promising looks different. The sessions land, the readers arrive, and then they bounce in seconds, which is when the pin overlay is the thing to fix.
Give it time before you judge any of it. Visual search indexing is slow, and a pin commonly needs a month or two before it settles into the searches it will eventually serve. That means the pins you make this week are being evaluated on results you cannot see yet, which is the same shape as the realistic affiliate marketing timeline for everything else on a new site.
So check once a month. Open the log you have been keeping, look at which angle type earned the most outbound clicks, and let that steer next month’s overlays. That is the entire analytics practice, and it takes about ten minutes.
Pick One Post and Start There
You do not need a content library, a follower count, or a daily quota to make this work. You need one published article, three honest angles, and a template you build once.
So do that this week. Open your site, pick one post you are proud of, write your three overlay lines, and put forty-five minutes on the calendar for your first batch. The first pin you schedule is the one that starts the clock on everything else.
Are your newest affiliate articles currently waiting out the early Google lull, or have you tested Pinterest traffic before? Leave a comment below with your biggest pinning question, or the pin angle you plan to test first. I read and answer every message.

Sonia Zannoni
Hi, I’m Sonia Zannoni, creator of Click to Prosper. I share practical tools, workflows, and honest guidance to help you build an online business with more clarity and less chaos.
About Sonia
Feeling stuck between too many tools and too much advice? Start with the beginner path.
View the Blueprint