

Build a Website on Wealthy Affiliate: Step-by-Step Beginner Guide

Affiliate Disclosure: This post contains affiliate links. If you purchase through one of my links, I may earn a commission at no additional cost to you. Read the full Affiliate Disclosure for details.
If you’re about to build a website on Wealthy Affiliate, you’ve probably read that using your own domain means paying for Premium. That leaves you choosing between more plan than you need and a siterubix.com address you never wanted for your business.
You didn’t misread anything. That rule shows up in guide after guide, and it was true under the old setup. The plans and the screens have changed since, and most of what ranks for this search still describes a version of the platform that’s gone. So if your account doesn’t look like the screenshots you’ve been following, that’s the guides’ problem, not yours.
The short answer on the domain is that it no longer needs Premium. Below are the five setup decisions in the order you’ll meet them, which plans include a site on your own domain, and the few things to check on your own screen.
TL;DR: Building a Website on Wealthy Affiliate
Step 1: Choose Your Address Before You Write Your First Post
The question I’d settle first is where your site will live, because every post, link and setting you add afterwards sits on that address. Wealthy Affiliate gives you three ways in:
- A free siterubix.com address. It costs nothing and lets you learn the whole setup on a real, working site.
- A new domain registered inside Wealthy Affiliate. The domain, its DNS and your email are all managed from the same account.
- A domain you already own elsewhere. You can connect it and leave it with your registrar, or transfer its registration to Wealthy Affiliate.
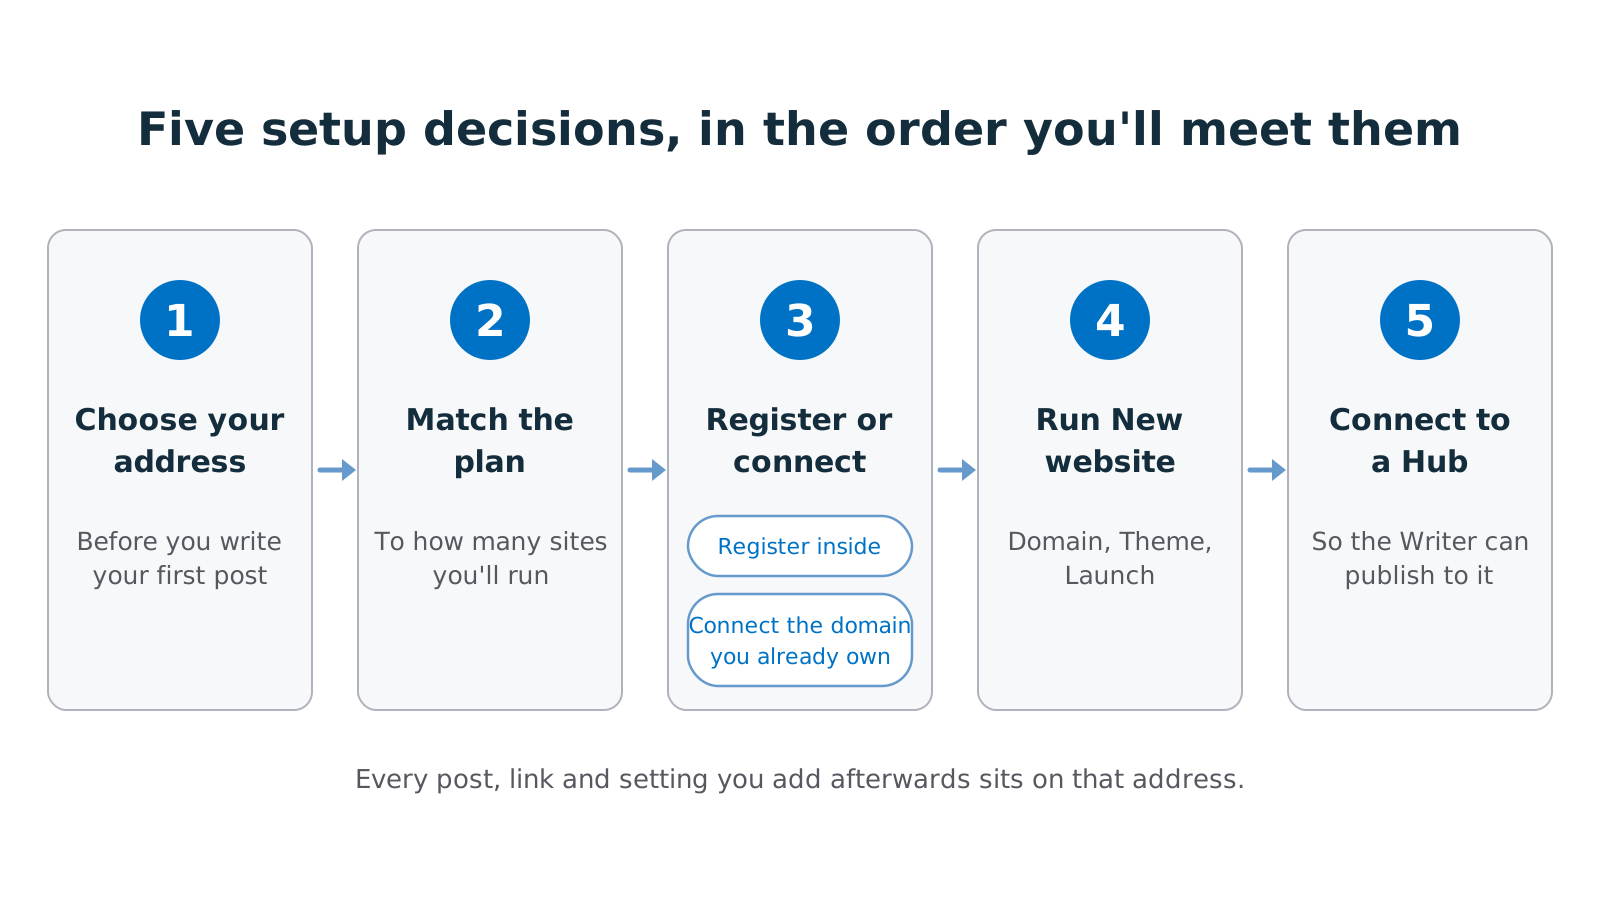
So why decide now rather than after a few posts? Changing the address once you’ve published is a site move. Every URL changes, so old addresses need permanent redirects to their new ones, and Google’s guidance on site moves says rankings can fluctuate while it processes the change. On a small site, that settling can take a few weeks.
None of that is a disaster, but it’s a few weeks of uncertainty you can avoid by choosing before your first post goes up.
The practice site still has a real place. It’s free, it teaches you the setup with no money on the line, and a free site can be moved to your own domain later from its row on the Websites page. The move brings your content, plugins and settings with it. What it can’t do is keep your URLs, so the sooner you move, the less there is to redirect.
If you already know you want your own domain, the next question is whether your plan lets you use one.
Step 2: Match the Plan to How Many Sites You’ll Run
Your own domain doesn’t need Premium. Every paid plan includes websites, and Builder includes one.
Here’s how the websites line up across the plans. Every plan gives you two email accounts per site. I’ve kept prices out of this post, and Wealthy Affiliate’s pricing page has the current figures.
Plan
Websites included
Address you can use
Need another site?
Starter
1 practice site
A siterubix.com address; own domain, check your account
Upgrade to a paid plan
Builder
1 website
Your own domain or a siterubix.com address
Extra websites available
Premium
3 websites
Same as Builder
Extra websites available
Premium Plus+
5 websites
Same as Builder
Extra websites available
Starter
Websites included: 1 practice site
Address you can use: A siterubix.com address; own domain, check your account
Need another site?: Upgrade to a paid plan
Builder
Websites included: 1 website
Address you can use: Your own domain or a siterubix.com address
Need another site?: Extra websites available
Premium
Websites included: 3 websites
Address you can use: Same as Builder
Need another site?: Extra websites available
Premium Plus+
Websites included: 5 websites
Address you can use: Same as Builder
Need another site?: Extra websites available
The Starter row is the one to read carefully. Starter includes a practice site on a siterubix.com address, so before you plan on using your own domain with it, check your own account or ask support.
If every guide you’ve read says Premium only, that’s because they describe the old plans. Wealthy Affiliate’s Websites page now lists a website on Builder, so you can check the table above against the platform’s own wording.
One more thing to check before you count your slots. When I looked at my own Websites page, on an older plan, the free siterubix sites I’d kept counted toward my website total.
Once I was over the limit, the sites I already had stayed online, but a new one needed an extra website slot or the removal of an existing site. Your plan may count them differently, so look at your own Websites page before you assume you have a spare slot.
With that checked, two things decide the plan:
- How many sites you’ll actually run in the next year. Count the ones you’ll build and keep publishing to, not the ones you might start someday, plus any free sites you keep if your account counts them.
- How many credits you’ll use. The platform’s AI tools run on credits, so how much you’ll lean on them belongs in the decision alongside your site count.
If you’re running one site, Builder covers it. If you’re running two or more, you don’t have to move up a plan to get them, because any paid plan can add extra websites. Whether adding sites to your current plan or moving to a bigger one works out better depends on your site count and your credit use together.
Premium comes with about twice Builder’s monthly credits and Premium Plus+ about five times, while each extra website is a separate monthly add-on. If you’d use the extra credits, moving up can work out better than adding sites one at a time.
My full Wealthy Affiliate review compares what each plan costs, so that’s the place to run the numbers for your own situation. Once you know your plan, the next decision is where the domain itself is registered.
Step 3: Register Inside Wealthy Affiliate or Connect the Domain You Already Own
This decision comes down to one question: do you want your domain, DNS and email managed in one place, or do you want your registrar and your host to be separate businesses?
DNS is just the set of settings that tells the internet where your domain points. A registrar is the company you pay to hold your domain name, and your host is where the site itself runs.
When you register a domain inside Wealthy Affiliate, it uses Wealthy Affiliate’s nameservers (ns1.mywahosting.com and ns2.mywahosting.com) by default, and hosting and email are configured for you. You don’t have to touch DNS to get the site live.
If you want more control later, the DNS options also include Advanced DNS, Custom nameservers and hosted subdomains. The domain’s settings show auto-renew, registrar lock and private registration, so you can see at a glance how it’s protected.
Connecting a domain you bought elsewhere starts with entering the domain and picking its current registrar. Before it sets up hosting, Wealthy Affiliate asks you to prove you control the domain with a TXT record (a short line of text you add in your registrar’s DNS settings), and it shows instructions written for the registrar you picked.
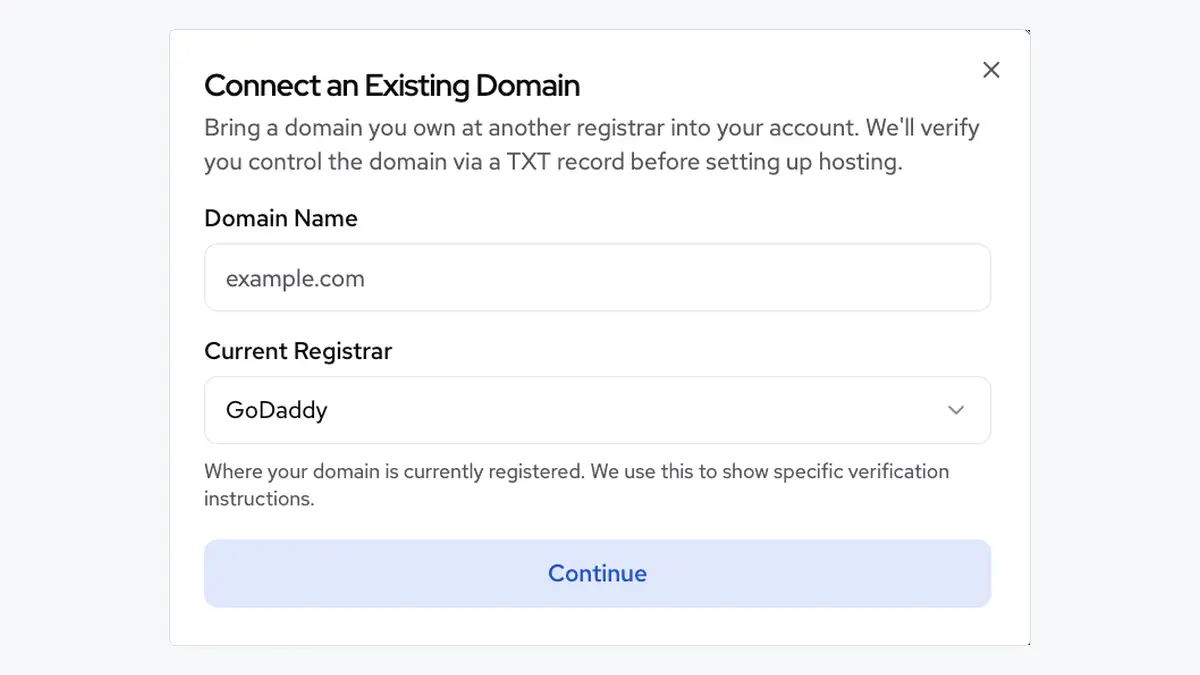
After you press Continue, follow the instructions your own screen gives you rather than a generic walkthrough. They differ by registrar, because registrars lay out their DNS settings differently.
There’s also a third route. Instead of connecting the domain, you can transfer its registration to Wealthy Affiliate.
A common worry about registering inside is whether the domain gets trapped there. It doesn’t.
The domain stays yours, and you can move it to another registrar later, though a registrar can block a transfer for a short window after the domain is registered or after a previous transfer. ICANN’s page on transferring a domain sets out a registrant’s right to move a domain between registrars.
So register inside if you don’t own a domain yet and want one dashboard for the domain, the site and the email. Connect if you already own a domain, or if you’d rather keep your registrar and your host as separate businesses. Either way, the choice isn’t permanent.
Step 4: Run New Website: Domain, Theme, Launch
With the address, plan and domain settled, the build itself is short. New website runs in three steps: Domain, Theme and Launch, and only the first one holds a decision that can cost you something.
The Domain screen lists the domains you own that don’t have a site yet, then the domains that already have one, then the options to register a new domain or connect one from elsewhere. Pick from the first group.
Building on a domain that already has a site replaces that site, so leave the second group alone unless replacing a site is what you mean to do.
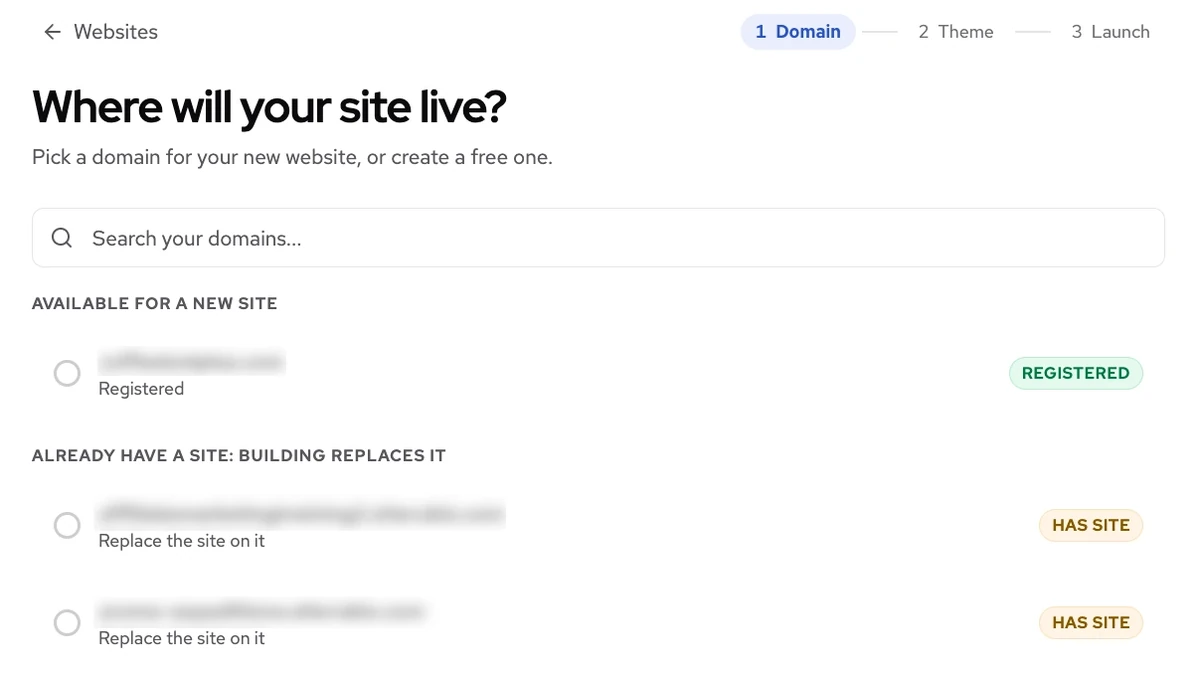
On the Theme step, go by what your own screen shows. Whatever you see there, a free theme is enough to launch on. Paying for a premium theme is a question for later, once you know which features you’d actually use, and if you end up on GeneratePress, I’ve worked through whether GeneratePress Premium is worth it.
Launch usually takes under two minutes. Publishing stays off while a site is being set up, moved or suspended, so if you can’t publish straight away, let the setup finish first.
Once it’s live, you can log in to the site’s WordPress admin in one click from the Websites space. Before you add anything, open the site and see which pages and posts it starts with on your own screen. It’s easier to tidy them up now than after you’ve built around them.
Each hosted site also has its own page showing its WordPress version, its storage (10 GB per site), its email accounts, its plugins, themes and users, and a staging copy. The staging copy is the one to remember: a private copy of the site where you can try a new plugin or a design change before it touches the version your readers see.
Step 5: Connect the Site to a Hub So the Writer Can Publish to It
This is the step people skip, and it’s why a finished post in the Writer, the AI agent that drafts your articles, can end up with nowhere to go.
A site can exist on its own, outside any Hub (the workspace Wealthy Affiliate gives each business), but the Writer only publishes to it once a Hub’s website channel connects it. From then on, a finished post goes out in one click, either now or scheduled.
You don’t need to understand everything a Hub does to make this connection, and how Hubs and Gameplans work is covered separately. For this step, the website channel is the only part that matters.
If the Hub has no site connected yet, the channel offers Set up your website. When you choose Start with my website, Ace, Wealthy Affiliate’s AI advisor, reads a site that’s hosted on Wealthy Affiliate. If your site is hosted elsewhere, Ace asks you what it’s about instead.
The channel’s menu also lets you change the site, build a new one, disconnect it or delete a hosted site. Only delete touches the site itself. Disconnecting keeps your plan and your drafts, so clicking around this menu is safe as long as you leave delete alone.
Your First Session on the New Site: Homepage, About Page and Categories
Before your first real post, I’d spend one session on three things, in this order.
Start with the homepage and the About page. Ace’s early Gameplans for a new site focus on getting both of them live, and they’re where a new reader decides whether a real person runs the site.
Treat what’s generated as a starting point, then rewrite it the way you’d explain the site to a friend. If you want a method for that, here’s how to go about editing AI drafts so they sound like you.
Next, set up a simple category structure before you publish anything. Categories are far easier to set before posts exist than after, when every change means reassigning posts and checking what moved.
Last, give the site a basic, consistent look: a consistent color, readable type, sensible spacing and a clean header, on whatever free theme you have. None of it takes long, and the basic design decisions that stop a site looking amateur fit into a single evening.
What Your Site Stays Tied To, and What Comes After Launch
Before you build on it for months, be clear about what you’re tied to. Your hosted site runs under your Wealthy Affiliate account.
When an account closes, access to its Hubs, content and hosted websites ends, and Wealthy Affiliate’s terms of service tell members to keep their own copy of anything they can’t afford to lose. So export what matters and keep that copy somewhere you control.
The domain is a separate matter. It stays yours, and you can move it to another registrar, apart from a short window after registration or a previous transfer when a registrar can block the move.
Later on, the site’s own page gives you three more serious options: move the site to another domain (content, plugins and settings come with it), replace it with a redirect, or delete it permanently. None of these are setup steps. They’re what you’d reach for further down the line, if your plans change.
If you’re weighing that tie against running your own hosting, my review covers what each plan costs and what leaving involves, and a three-year hosting cost breakdown shows what the standalone route actually costs.
Once the site is live, expect it to be quiet for a while. A new site’s pages take time to be discovered and indexed, and longer to start ranking, so a realistic window for results is 6 to 12 months or more.
If you want to know what normal looks like, here’s what the first 24 months usually look like for a part-time builder.
Your next step is small. Pick your address, then open a practice site and walk through New website once, so the real build holds no surprises.
Which setup question do you still have? Leave it in the comments. I read and reply to every one.

Sonia Zannoni
Hi, I’m Sonia Zannoni, creator of Click to Prosper. I share practical tools, workflows, and honest guidance to help you build an online business with more clarity and less chaos.
About Sonia
Feeling stuck between too many tools and too much advice? Start with the beginner path.
View the Blueprint